Today we will be examining my most popular dweet, a miniature black hole simulation! It’s one of my easiest dweets to explain and the code is fairly straightforward. Read on for a full analysis…
for(i=0;i<2e3;x.fillRect(i?960+i*S(F=260*(t+9)/i+S(i*i)):0,i?500+.2*(2*i*C(F)+2e4/i):0,K=i++?S(i)*9:2e3,K))x.fillStyle=R(99*i,2*i,i,i?1:.4)
I should first confess that this works nothing like a real black hole, just in case there are any astronomy nuts reading this. I started by trying to model a spiral galaxy and then experimented with giving it a gravity well type shape. It looked really cool so I tweaked it a for a while to make it seem more like a black hole. I remember seeing similar images in old magazines like Popular Science so that’s kind of how it came about.
Here’s the dweet we will be looking at running live. You can play around with the code while we talk about it.
As always, we begin by reformatting the code so it is easier to read. I did that here by adding some white space and moving the fillRect to the end. I’ve also added some comments to describe what each line does. Here’s a link to open this code in my custom JavaScript editor CapJS.
for ( i=0; i<2e3; )                             // for loop head
x.fillStyle = R( 99*i, 2*i, i, i?1:.4 ),        // set color
x.fillRect(                                     // draw rectangle
  i? 960 + i*S( F = 260*(t+9)/i + S(i*i) ) : 0, // X coord
  i? 500 + .2 * ( 2*i*C(F) + 2e4/i ) : 0,       // Y coord
  K = i++? S(i)*9 : 2e3, K)                     // width, height
Now with the code a bit easier to read, we can talk about it one line at a time.
for ( i=0; i<2e3; ) // for loop head
This for loop will iterate over each of the 2e3 (2000) stars. Notice how i starts at 0 and is not incremented in the loop head. This is because we need i==0 to do something special, that will be the background layer and must be rendered first.
To save space we are going to use the same code to draw both the background and the stars. This is a great trick when you need a partially transparent background.
x.fillStyle = R( 99*i, 2*i, i, i?1:.4 ), // set color
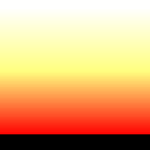
Here we are setting the draw color with x.fillStyle, x being the 2D canvas automatically context created for us by Dwitter. The R function generates rgba strings, it’s the only non-standard JavaScript function provided by Dwitter.
The first 3 parameters to R are the red, green, and blue values in the range 0-255. The channels are scaled to make it transition from red to yellow and finally to white. Each channel is multiplied by i so it gets brighter as i increases and is black at i==0 which is what we need for the background layer.
The final parameter to R is the alpha setting and the first special case for i==0. We want the background layer to use partial transparency so the stars will have a motion blur effect. The value of .4 controls the length of the trails by letting previous frames bleed through. Notice that instead of i!=0 we can just write i. One optimization I missed here is that “i?1:.4” can be shortened into “i+.4”, since it doesn’t matter if the alpha is above 1.
x.fillRect( // draw rectangle
The background and each star is drawn by this same fillRect. I split the parameters onto separate lines so we can talk about each part separately.
i? 960 + i*S( F = 260*(t+9)/i + S(i*i) ) : 0, // X coord
First we check for the special case i==0. Both the X and Y axis need the background layer to draw from the top left corner (0,0) so it can fill the entire canvas. The end result is the background will be drawn as x.fillRect(0,0,2e3,2e3).
After the background layer we can draw the stars which spiral out from the center. The canvas created by Dwitter is 1920 pixels wide so to center things we just add half that which is 960.
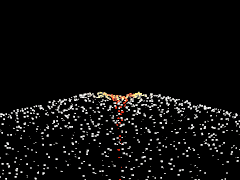
We will build the shape using trig functions sine and cosine. The result of sine S is multiplied by i so the stars get farther from the center as i increases. The parameter for S is stored in F so it can be reused by the Y axis which has similar code but using cosine instead of sine.
The variable F is where the real magic happens for this dweet. The first part of F handles the change over time, passed in as t. We will offset t by 9 seconds because it does not start out looking much like a spiral. The image to the left shows what it would otherwise look like at t==0. To speed up the rotation we just scale by 260. The spiral develops over time due to division by i here which makes the rotation speed proportional to distance from the center.
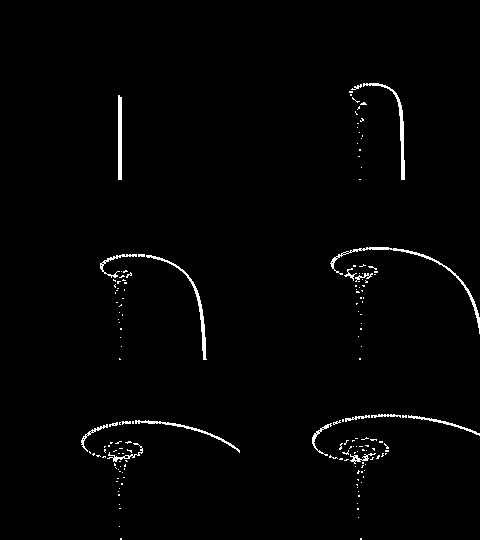
We add S(i*i) simply to widen the spiral, otherwise it would have no thickness. This makes the thickness 2 (sine goes from -1 to 1) out of a maximum 2*PI, which comes out to ~32%. The reason for S(i*i) as opposed to just S(i) is because this introduces some chaos to hide the regularities that would otherwise be present.
The animation to the right show how the spiral would develop over the first few seconds using a simplified F=t/i, without the time offset or widening factors.
i? 500 + .2 * ( 2*i*C(F) + 2e4/i ) : 0, // Y coord
The Y axis works similar to the X axis as you might expect with a spiral shape. To center things we again just offset, this time by 500 because the canvas is 1080 high and it looks better slightly above center. The Y position is scaled by .2 to make it seem like it’s being viewed from an angle. We already calculated F which is passed to cosine C just as it was passed to sine S for the X axis and the result is again scaled by i.
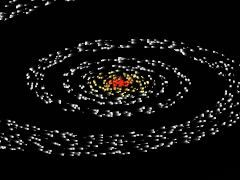
The main difference for the Y axis is the term 2e4/i is also added. This is what causes the characteristic funnel shape with the center dipping down and gradually flattening out. The image to the left shows what it would look like without this term.
One small improvement I now notice is that the 2 can be factored out leaving “.4*i*C(F)+4e3/i”.
K = i++? S(i)*9 : 2e3, K) // width, height
Again we must check the loop variable i, and at last we can increment it because this is the end of the loop. For the case of i==0 we want to the size to be large enough to cover the screen, 2e3 works perfect for a 1920×1080 canvas.
The size of each star is varied by S(i)*9. Half of the stars have negative scale, but that doesn’t prevent them from being rendered via fillRect. The width is stored in K and to be used again for the height to draw a square.
Wow, that pretty much covers everything! Let’s take one last look at code with a few improvements mentioned. These changes save 6 additional bytes, cutting it down to 133 from the original 139. I also tweaked the alpha parameter to make the trails more visible.
for(i=0;i<2e3;x.fillRect(i?960+i*S(F=260*(t+9)/i+S(i*i)):0,i?500+.4*i*C(F)+4e3/i:0,K=i++?S(i)*9:2e3,K))x.fillStyle=R(99*i,2*i,i,i+.2)
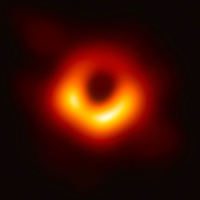
To help apologize to all the astronomy fans out there who might be disappointed, I made another dweet to approximate the first image of a black hole. This one works completely differently then what we just went over, maybe we’ll talk about it someday in a future post.
I will leave you with this more realistic black hole animation. I hope you learned something new. As always, feel free to build on my code to make your own creations. Please share on twitter if you enjoyed this post, thanks for reading!



Pingback: Collective #535 – Find Right Software
Pingback: Collective #535 | Web Design News from Dubado
Pingback: Collective #535 - News 20h
Pingback: Collective #535 – Slacker News
thanks, now will play with it a bit
is there some other similar explanation without the lengths constraint on astronomy in JavaScript?
That’s a good question. I am sure there are more realistic JavaScript astronomy simulations out there. Let me know if you find one!
black holes are not funnels. they have no true dimension. if they did, then galaxies would be funnel shaped or what ever. instead they are flat.
copied from my guess on libertree:
if they had a dimension then galaxies would look like drain funnels – but they dont. they tend to be pretty flat. nothing escapes but gamma rays with the death of a star that enters a black hole. gamma rays exceed the speed of light in order to do that. also some other particles also exceed the speed of light and we are not certain why. but in general most energy and matter totally disappear in a black hole. until we send a spacecraft directly into the center our own milky way galaxy, well never be certain. but it would take almost 100,000 years to get there at the speed of light. but by then we will be about to collide with the andromeda galaxy which would fuck up the deal of sending a craft. yes, ive read sagan and hawking and and few others about this. i met hawking at MIT – he was a riot.
btw, what happens when two black holes meet? a super black hole? what happens when space is full of nothing but black holes colliding? another big bang? we dont know.
https://www.sciencealert.com/scientists-have-found-two-supermassive-black-holes-on-a-course-for-collision
In this code the funnel shape represents the curvature of space time. It might be more accurate to say this is a 2D black hole.
Pingback: === popurls.com === popular today
Thanks for the details! are S() and C() Dweeter-given aliases to Math.sin and Math.cos?
Yep, there are only a couple aliases that dwitter provides, the trig functions make up about half of them.
Muy bueno
Pingback: Newsletter 85 Reboot | import digest
Pingback: Adventures in Tiny Coding – My 2019 In Review | Killed By A Pixel
It would be awesome if you can reproduce this with Phaser Framework :)
Very cool!