Today we will dissect the tiny JavaScript code that draws a parallax background with mountains and sky. This simple code can be used as a base to create different types of background scenes for your game or website.
for(w=i=99;i--;)for(j=0;j<9;x.fillRect(i*20,j++?w*j+w+w*C(q/9)/j+59*C(q/3.9)/j:0,20,3e3))q=(j*w+i+t*j**3),x.fillStyle=R(9+j*40%w,j*20,w-j*9)

Continue reading on for a full explanation of how it works!
Landscape scenes have been a favorite subject for artists throughout history. It’s no surprise that there are many dweets that create a landscape in one way or another. It’s one of my favorite things to program. There’s something incredibly satisfying about seeing the world recreated in a tiny bit of code.
Here’s the actual dweet running live in an iframe, you can play around with the code while we talk about it!
Our first step is to reformat the code so it’s easier to read. I just added some white space and moved x.fillRect to the bottom so it reads order of execution.
Here’s a link to open this code in my custom JavaScript editor and capture tool CapJS. It’s much more user friendly then editing code in the iframe above.
for ( w=i=99; i--; )                           // horizontal scan
for ( j=0; j<9; )                              // 9 layers
 q = ( w*j + i + t*j**3 ),                     // get position
 x.fillStyle = R( 9+j*40%w, j*20, w-j*9 ),     // set color
 x.fillRect(                                   // draw rectangle
  i*20,                                        // X coord
  j++? w*j+w + w*C(q/9)/j + 59*C(q/3.9)/j : 0, // Y coord
  20, 3e3 )                                    // width & height
Now it’s a bit easier to see what’s going on. The plan is to render layers of vertical scan lines at different heights to create the mountain scene.
Let’s go through it one line at a time…
for ( w=i=99; i--; )
First we set up the for loop. Each iteration will control a vertical scan line as we move from left to right.
We also will store 99 into w so we can use w in place of 99. To save space we will try to reuse this number 99 as often as possible and in fact it will used 6 additional times.
for ( j=0; j<9; )
This second for loop iterates through each of the 9 layers drawn from back to front. This will end up drawing 99*9 rects total which is under 1000 draw calls. That is fairly low so it should still preform well on slower browsers.
q = ( w*j + i + t*j**3 ),
Here is where we calculate q, a value that will be passed to cosine to shape and animate the mountains. I’m not sure why I left those parenthesis around the equation though, they aren’t necessary and can be removed to save 2 bytes.
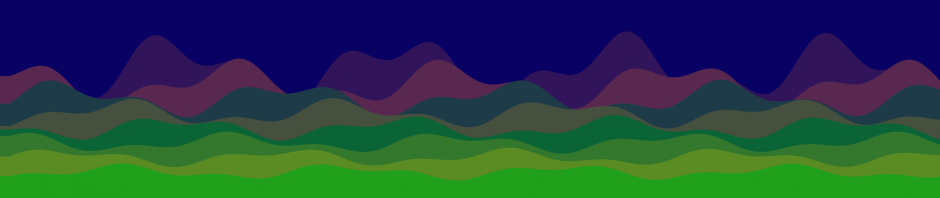
The j*w term is just to offset the initial starting point, so all the mountains don’t begin perfectly aligned like the image to the right. After a few seconds the mountains start to separate so it could be omitted to save space if necessary.
We must offset by i for each vertical scan line to form the image drawn left to right. We could scale i here to stretch or shrink the waves.
To make the paralax animation we add t*j**3. This scales t (time provided by dwitter) by j to the third power, effectively making the scenery in higher layers pass by exponentially faster.
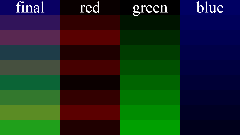
x.fillStyle = R( 9+j*40%w, j*20, w-j*9 ),
 This is where we set the color for each layer by setting fillStyle on x, the canvas context. We will use the R function provided by dwitter which takes 3 args for red, green and blue of values between 0-255.
The image to the left shows the final palette and how each of the color channels changes with each layer.
The red channel (9+j*40%w) is the most complex. Multiplying j by 40 combined with modular division by 99 results in a value that jumps around between 0 and 99. We add 9 to just shift it slightly more red.
The green channel (j*20) makes closer/higher layers progressively more green.
The blue channel (w-j*9) starts out at 99 when j is 0 and gradually gets less blue for closer layers. This makes the background blue and creates a slight atmospheric effect.
x.fillRect(
We will use x.fillRect to draw vertical scan lines as tall thin rectangles.
i*20,

We are drawing vertical scan lines so the X coordinate will just be i times the width of each scan line. The image to the right makes the individual scan lines visible by changing 20 to a smaller value.
The width of each scan line is 20 because the canvas with is 1920 pixels wide and we have 99 scan lines so that’s 1920/99 rounded up.
j++? w*j+w + w*C(q/9)/j + 59*C(q/3.9)/j : 0,

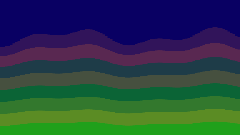
Here is the heart of the dweet. This is where we calculate the y position to give the mountains their shape. The animation to the left shows how the layers overlap.
The first step is to check if j is layer 0 and increment it. For layer 0 we need the Y coordinate to be 0 so the background starts at the top of the canvas.
The w*j+w term shifts and stretches the mountains vertically so that they spread out, leaving some extra space at the top for the sky
To shape the mountains we will combine two sine waves using the dwitter shortcut C for Math.cosine. The wavelength and amplitude for each of these waves has been tweaked to create an interesting interference pattern. The values 9 and 3.9 were chosen to because they have a large common multiple so the mountains will not repeat often.
We will also divide the result of cosine by j so the foreground layers become more squished vertically.
20, 3e3 )
This sets the width and height of the rectangle. We saw earlier that the width of each scan line is 20 pixels. The height is just a large number so the scan line will cover the full length of the 1080 pixel tall canvas.
Let’s take one last look at our dweet with the improvements I mentioned. We can trim another 2 bytes bringing the size down to 138 characters…
for(w=i=99;i--;)for(j=0;j<9;x.fillRect(i*20,j++?w*j+w+w*C(q/9)/j+59*C(q/3.9)/j:0,20,3e3))q=w*j+i+t*j**3,x.fillStyle=R(9+j*40%w,j*20,w-j*9)
I have continued playing around with this code to make some more complex variations. I will leave you with my favorite one so far. Trying to recreate my memories of looking out the car window during long drives as a kid, watching power lines pass by.
That wraps up of another dissection. Thank you for reading, I hope you learned something new. Please like or retweet on twitter if you enjoyed this post. See you next week!


Pingback: 2019 – Year In Review – Adventures in Tiny Coding | Killed By A Pixel